5/28/15
There are already so many free junk file cleaners available for Windows – the most popular of them being CCleaner. So why then are we again covering another one? Because life is all about having options, and Windows ecosystem offers so many freeware options that one has to check them out and see what suits you the best.
Glary Disk Cleaner comes to from the well-known Glarysoft house. It offers a handy way to clean up your hard disk. It can scan your PC thoroughly and locate the temporary, unused and unwanted files cluttered on your hard disk and delete them in no time. Although Windows has its built-in disk cleanup utility, but sometimes you may feel the need to use a third party app.
Glary Disk Cleaner is a simple tool which takes no time to download and install 0n your PC. The program has a very user-friendly interface and even a novice computer user can use it without any hurdles. You can choose to run the program right after its quick installation. It simply scans the hard disk of your computer, locates the temporary files and removes them.
Glary Disk Cleaner starts scanning your PC immediately after you launch the program and gives you a quick list of files stored on your PC. You can either select the files and remove them manually or choose to delete them all in one go.
The Disk Cleaner checks the Windows, your web browsers as well as the applications installed on your PC and locates all the temporary and unused files including temporary files, cache, system log files, error report files, invalid and broken shortcuts, browsers cache and much more.
The list of files also display the path, size and format of files located giving you and option to check the file before you delete it. You can view the file in its folder, check its Properties and exclude from the removal list if required.
I don’t know if it was the size of my hard drive or the lesser number of temporary files stored on my PC, but the program actually took just a few seconds to scan my PC. Usually when a PC is under scanning, the CPU usage increases which tends to slow down the PC for the time being. But there is nothing to worry about when using this freeware.
The program is very simple and effective and I didn’t find any noteworthy issue in the program. It scanned the PC quickly and also deleted the files in no time. In short, it did is job! It is a pretty decent piece of software from the makers of Glary Utilities and can help you keep your system clean.
You can download it here.
5/7/15
Screen To GIF: Free software to create animated GIF Image within seconds
Author: Unknown | 11:10 PM | 3 comments |
GIF image is highly sought file format amongst tech bloggers, who often write on how-to guides, as well as meme makers. Hence today we will look at a free yet extremely helpful software named Screen To GIF that helps you produce high-quality animated GIF image within a few moments.
Create GIF image using Screen To GIF
ScreenToGIF is probably the simplest way to record your screen and turn them into a GIF image or motioned image. This particular tool includes a number of handy features and tools, that will assist you in editing the GIF image before finishing.
To start with, download portable ScreenToGIF on your Windows PC. This is a portable software as well. After downloading this portable GIF image creator software, just unzip the file and double-click on it to open. You will see a window as follows:
The very first thing that must be set is to change the aspect ratio or the window size depending on your requirement. The default size of 484×209 is comparatively small for most.
Once you have et the default image size, you can start recording your screen by clicking on the Record button. To stop the recording, simply click on Stop button. Right after recording the screen, you will get a window that looks something like the subsequent picture:
Now, you have a whole bunch of options to edit the image before finalizing. You can add the following to your image, after recording:
- Add text
- Add quick caption
- Add image frame or title frame
- Edit frames
- Change animation speed
- Crop image
- Use transitions
- Add border around image
- Export specific image frame (More information are written below)
- Delete selected image frame (More information are written below)
- Use filter: Blur, Sepia, Gray Style
Get a still image from GIF image
Apart from creating the GIF image, you can also export a still image from the recording. ScreenToGIF helps users to change the frame number that will be captured in each second. If you have set a huge number, you will get more frames or images. This is what “Export specific image frame” means.
ScreenToGIF Settings
Screen To GIF doesn’t come with a huge number of settings. Instead, it has fewer but very useful features.
- Use custom GIF encoding or paint.NET encoding
- Change loop – use custom loop
- Show or hide mouse cursor
- Show or hide mouse clicks
- Use hotkeys to start and stop recording (F7 – Record/Pause & F8 – Stop)
- Change aspect ratio
- Change number of frames to be captured in a single second
Download Screen To GIF from here and start creating quality GIF images on your Windows PC.
Uranium Backup Free review & download
Author: Unknown | 11:02 PM | No comments |
There are plenty of free backup tools available. Even the default backup tool that comes with Windows 8.1 is good enough to let you take different backup sets of the data you want. You also get to choose between overwriting backup sets and incremental backup sets. However, most people prefer third-party backup tools as they offer more functionality. This review of Uranium Backup Free checks out it features and ease of use.
Uranium Backup Free review
The download and installation was easy. There are no third-party apps that are bundled into the installation, as of date, so you need not worry about it installing toolbars and other browser add-ons. It is just the Uranium backup program that is installed.
Once installed, you can access it from the System Tray by right-clicking on its icon or by clicking on the desktop icon. In both the cases, the first thing you have to do is to create backup sets and set destinations for the backup sets.
Too many restrictions
Unfortunately, the free version has plenty of restrictions. One that I would like to mention in particular is that it won’t support incremental backups. This means that every time you run the backup using Uranium, you will be creating a different backup set or you will be overwriting the previous backup depending upon the folders you chose.
Though the image above shows you plenty of destinations to back up, all except the first are available only in the paid versions. With the free version, you can only select a place on your network or on an external hard disk drive for backing up the data. You cannot even use the DVD burner with the free version. Now, that is way too much of a limiting factor, that may make people away from using Uranium. As it is, people nowadays prefer to back up their data to cloud instead of DVDs, etc. If that option is present but cannot be used in the Uranium Backup Free, people are sure to be frustrated.
In short, the free version of Uranium backup tool will serve only those users who like to create a full backup of their data and copy it to external hard disk drives. There is no point in backing up data to the same hard disk drive even if it is a different drive letter as the hard disk is the same and if it crashes, all the drives on it will be inaccessible.
The application is good only for users using external hard disk drives for backing up data. For others who would like to back up to cloud etc, Microsoft, Amazon and Google are the answers (for free backups). If they want to go paid, IDrive, ADrive, Mozy etc are better as they offer backups directly to the clouds.
Using Uranium
Assuming that you are one of the group that prefers local hard disk backups to external storage on network or USB connected hard disk drives (or even on a desktop with two hard disk drives), you have to first create a data set that needs to be backed up. This, you can do by selecting Create Data Set option in the File menu. You will get a dialog box that will let you browse and select the backup folders and files using check boxes. Once you are done, selecting the files to be backed up, you have specify the destination folder.
To specify the destination folder, click on the first option under the lower section of the right side of the Uranium window. It says “Click here to add a destination folder for this backup“. You can see it in the image above.
Clicking on any other option will ask you if you wish to upgrade.
Anyway, once you are done with creating backup sets and setting destination for it, you can run the first backup manually by clicking on “Run selected backups” in the File menu. Some of the best things about Uranium are that it compresses the backup files and folders before copying them to backup destination and it offers encryption for the backed up files. But I did not see any option to set up scheduled backups or incremental backups. This means it overwrites the previous backup set whenever you run the backup set manually. The only method available to avoid overwriting is to select a different destination (folder) before you manually run the backup using the Uranium interface or the system tray icon.
Verdict
Uranium Backup Free is a good choice if you back up your data locally to some other hard drive connected to your computer. The paid version has options to back up to cloud but the free one doesn’t.
Encryption is present, so you can be sure about secure backup. You can save configurations using a password in the Settings menu. Beyond that, it is simply a tool offering minimal features. If you wish to back up to cloud, either purchase the Pro version or use one of the tools mentioned above. You can download Uranium from their website.
There are some other good free Imaging, Backup and Recovery Software available on the Internet. Moreover, there are also some free online backup tools that you might want to consider if you wish to back up to cloud and if your backup needs are small. Besides this, you may also use Microsoft OneDrive or Google Drive for backing up, although they are more of sync nature. That is, if you delete a file or folder from the local disk, it will be deleted from the cloud storage too. An advantage is that instead of deleting them forever, the deleted items are moved to folders called Deleted Items or Trash and they stay there until you empty them manually or if they exceed the quota of Trash (in Google Drive). They can be used as backup in case you want the latest version of your backup sets on the cloud.
AnyDesk: Best Free TeamViewer Alternative
Author: Unknown | 10:59 PM | 3 comments |
If you are working as a team, this is impossible that you haven’t heard about TeamViewer. If you are looking for aTeamViewer alternative, then this free software called AnyDesk may interest you. This fast remote desktop software has DeskRT, a new video codec at its core.
AnyDesk review
As AnyDesk is a free portable software. If you want to use it for a long time, you can consider installing this using its installer.
To get started, at first, download AnyDesk on both the PCs. Next double-click on the executable file to open it. You will get a window that looks like the following picture:
Teamviewer alternative
A unique code will be appear on your screen. You can find this type of code, only if the software is not installed. Otherwise, you will get the unique with the Computer name.
Now, just enter this unique code of one PC in another PC’s AnyDesk window – under Remote Desk tab and hit theConnect button.
That means, if you have two PCs called “A” & “B” and you want to access “A” from “B”, just copy the code from “A” and paste it on “B”.
After hitting the Connect button, you will get the Windows Firewall popup for this new connection. Just allow it to access AnyDesk.
At the same time, you will get a confirmation pop-up on the second PC that you want to access from your primary PC.
You can hit the Accept button or consider checking few options. The options are as follows,
- Allow to hear sound
- Allow to take control
- Allow to use clipboard
- Allow to block keyboard and mouse
If you remove the tick mark from corresponding option, the feature will be unavailable. Otherwise, the main PC owner will be able to access everything.
Chat with Friends using AnyDesk
AnyDesk allows users to chat with the connected PC owner. Just click on Chat button from the primary PC and write down your message.
The message will appear on the second PC.
AnyDesk also provides some other options after connecting. You will see the following options on your screen:
- Change view mode (full screen, original, shrink, stretch)
- Quality: best audio/video quality, balanced, optimized, according to connection speed/data speed
- Show/hide remote cursor
- Allow/prevent mouse and keyboard control
- Take snapshot.
Considering all things, AnyDesk is really a useful tool. You can download AnyDesk from here. As of now, you can use AnyDesk to connect with only Windows PC’s.
4/22/15
PC Win Booster: Keep your Windows PC free of Junk Files
Author: Unknown | 3:45 AM | No comments |
If you find that you are running out of disk space on your Windows PC, you need to run the built-in Disk Cleanup utility or some good free junk file cleaner. Today we will have a look at one more freeware called Soft4Boost PC Win Booster.
Hard disk is the storage device of a PC which holds all your important files and data. The Windows operating system and various other programs create the temporary files and many other junk files during installation and running. All these files get piled up on your hard disk, and hence the hard disk may run out of free space. Thus, it becomes imperative that we delete the junk temporary files regularly.
This tool will help remove junk files. Not hundreds, but thousands of files get piled in the hard disk of our computer system over time, which includes cached thumbnails, temporary files, cached files, setup files, log files and much more.
Hard disk is the storage device of a PC which holds all your important files and data. The Windows operating system and various other programs create the temporary files and many other junk files during installation and running. All these files get piled up on your hard disk, and hence the hard disk may run out of free space. Thus, it becomes imperative that we delete the junk temporary files regularly.
This tool will help remove junk files. Not hundreds, but thousands of files get piled in the hard disk of our computer system over time, which includes cached thumbnails, temporary files, cached files, setup files, log files and much more.
PC Win Booster
The main overview of this freeware is simple and displays everything. The software scans your PC and detects all the junk files stored in various folders. It lists all the unused, obsolete and harmful files cluttered in your PC.
Just click on ‘Start Scanning’, the program will scan your PC thoroughly and give you a detailed list of junk files.
It includes the following modules:
- Junk File remover
- Duplicate Files Finder
- Unwanted Toolbar remover
- Program Uninstaller.
The Duplicate Finder module of the program finds duplicate files, identical pictures, and duplicate documents if stored in your system. Unlike the other similar software, PC Win Booster compares the documents by their content, and not just the names. To use this function, select the search rule, click on the Duplicate Finder button, select the search directories and click on ‘Start Scanning’.
Moreover, this program also finds and removes toolbars that may be installed on your web browser and remove them easily – which the built-in Windows program remover may not be able to.
PC Win Booster has 11 different skins, so you can change it if you want. However, I didn’t find any of the skins beautiful enough to be changed.
You can download it from here. It brings along a program Soft4Boost Secure Eraser with it – however, it is harmless and can be easily removed using the Control Panel.
How to display seconds in Taskbar
Author: Unknown | 2:30 AM | No comments |
The Taskbar Clock in Windows, displays the date and time. The day, month and the year are displayed – and the hour and minutes are seconds are displayed. In this post we will see how to display second in the Taskbar Clock.
Before we proceed, it is important to know, why Microsoft did not build this capability into the Windows operating system to begin with. Was the constant blinking of the colon too distractive?
Said Microsoft,
The blinking colon and the constantly-updating time were killing our benchmark numbers. On machines with only 4MB of memory (which was the minimum memory requirement for Windows 95), saving even 4K of memory had a perceptible impact on benchmarks. By blinking the clock every second, this prevented not only the code paths related to text rendering from ever being paged out, it also prevented the taskbar’s window procedure from being paged out, plus the memory for stacks and data, plus all the context structures related to the Explorer process. Add up all the memory that was being forced continuously present, and you had significantly more than 4K.
Now that we know why the Windows Taskbar Clock does not display seconds, let us move on.
We have already seen how to how to add day of week to taskbar clock,no let us see if we can add seconds to the Taskbar Clock time.
Display seconds in Taskbar Clock
There is no way to natively display seconds in the Taskbar Clock. If you wish to do so, you will have to use 3rd-party free tools like T-Clock Redux or TClockEx.
T-Clock Redux in an enhanced fork of Stoic Joker’s T-Clock 2010. Apart from letting you display the seconds too, it offers many other features. It works on Windows 8.1 and Windows 10 too. TClockEx is such free tool that can help you show seconds. This one also lets you tweak additional options in the Takbar Clock.
4/14/15
How to change MAC Address in Windows 8.1
Author: Unknown | 10:36 PM | 5 comments |
A MAC Address or Media Access Control Address is a unique identifier assigned to every Network Interface Card. In this post, we will see what is MAC Address and how do you change a MAC Address in Windows 8. We will also touch upon MAC Address filtering, lookup and spoofing.
What is MAC Address
Whether you are using a wired network or a wireless one, you need a network card to connect to other computers and to allow other computers to your computer. While most of us believe that it is the IP address that is significant in contacting another computer on the network, it is not the only factor. More important than IP (Internet Protocol) address is the MAC (Media Access Control) address – an address assigned to the network interface card, so that it is identified on the network.
A Network card is a term used in short for a Network interface card. We call it NIC for short. Every NIC has a MAC address – just like a postal address so that the data packets travelling on your network can reach the correct NIC and from there, your computer. While the IP address is the software part of the Network Interface card (Network card or NIC), the MAC address is hardware address, without which data packets will just keep on roaming on the network, as they do not have any address where to deliver the data. Each data packet on the network has a header containing MAC address of the computer you wish to connect to and then the data. The last part of the data packet will contain a bit to ascertain if the data bit was correctly delivered or was it corrupted or changed during the transmission.
MAC addresses do not appear when you click on Open Network Adaptors in the Windows System Tray. Unlike IP addresses, that are provided by your ISP or network admins, and may be static or dynamic. MAC addresses are assigned by the manufacturers of network interface cards (NIC). These MAC addresses are built into the cards and are resolved using a method called Address Resolution Protocol. This Address Resolution Protocol first obtains the IP address of the computer to be contacted and then resolves it into the MAC address before embedding it into header of the data packets so that they are delivered exactly to the computer intended and not to any other computer in the network.
Structure of MAC Address
A MAC address is separated by full colons, as is the IP address (IPv4 addresses). But unlike only four numeric characters separated by full colons to make it look like a four digit sets x 4 parts, the MAC address is a combination of alpha-numeric characters. It is a set of six characters separated by six full colons. Also, unlike the four characters used in IP address per set, the MAC address employs only two characters per set. Here is an example of a MAC address for your understanding:
00:9a:8b:87:81:80
You can see that it is six sets (parts) divided by full colons and can contain both alphabets and characters. The first two or three sets indicate the code of manufacturers of the network interface card just like the first two sets of IP address tells you where you are located.
How To Locate MAC Address of NIC (Network Interface Cards)
To locate the MAC address of your network adaptors, you have to go to the command line. Press WinKey+R, type cmdin the Run dialog box that appears and press Enter key.
Type getmac /v /fo list and press Enter key. The output for each of your NIC adaptor (network adaptors – wired and wireless) will be displayed.
Change MAC Address in Windows
It is not advised to change the MAC address on networks as it may create conflicts and sometimes, may fail to appear on the network. But if you want to change the MAC address for some reason, it is an easy process.
1. Press Windows Key + Break to open System Window
2. Click on Device Manager to the left side of the System Window
3. Once the Device Manager dialog appears, look for the category named Network Adaptors
4. Click on the plus sign preceding Network Adaptors to see all the Network cards attached to your computer;
5. Select the network adaptor whose MAC address you wish to change
6. Right click on the network adaptor and select Properties
7. Click on the Advanced tab.
8. In the list of available options, select Locally Administered MAC Address or Network Adaptor; note that only of the two options will appear based on the type of your network adaptor
9. When you select one of the above options, you will get a text box saying Value.
10. Type a six digit alphanumeric code in the Value field after selecting the radio button; note that you do not have to type the dashes or full colon; if you wish to type 00:4f:gH:HH:88:80, you simply type 004fgHHH8880 without any dashes or full colons; adding dashes may result in error
11. Click OK to close the dialog box
12. Close other open dialog boxes (if any) and close the Device Manager
That is the simplest method to change the MAC (Media Access Control) ID of the network adaptor.
MAC Address Spoofing and Filtering
Spoofing is a method by which you change your MAC address to someone else’s MAC address. That is the common notion in the world of Internet. Spoofing is useful when your network won’t let you in due to MAC filter restrictions. Hackers too indulge in MAC address spoofing.
When you change the MAC address using the above method, you are actually spoofing the MAC address. The hardware MAC address remains the same, but is given preference only when there is no other address. If you want to revert to the original MAC address, just follow the above steps and instead of inputting a value, select the radio button that says “Not Present” or “No Value“. That will get you back your original MAC address.
MAC addresses are especially useful when it comes to protecting your network from unwanted connections. All you have to do is to authorise only the MAC addresses that you wish to connect to the Internet or the network. This you can do it easily using third party programs. You can also filter MAC addresses manually by going to your router page and entering the MAC addresses that are allowed to interact with the router.
Disk SpeedUp: Freeware to Defragment and Optimize Hard Disk
Author: Unknown | 10:08 PM | 2 comments |
Glarysoft Disk SpeedUp is a completely free tool to analyze, defragment and optimize disk space in quick time and enhance your computer performance. The freeware is easy to use, without any toolbar or adware and boasts an intuitive interface.
The user-friendly interface offers basic functions:
- Analyze the disk
- Defrag the disk
- Defrag and optimize the selected disk/file/folder
- Automatic defrag (when PC is idle)
- Automatic shutdown (when defrag completed and schedule preset)
Apart from the above the tool features advanced settings to meet advanced requests.
Disk SpeedUp Freeware Review
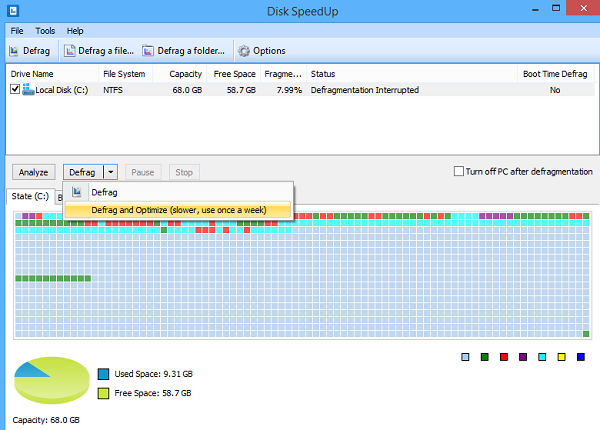
When the download of the application is complete, installing it will take a minute. Initially, you will see the main application window split into 2 tabs dedicated to
- Defragmenting tasks
- Configuring settings
If you observe the image closely, you will find all drives along with their capacity limit, free space and fragmented space and status are shown in the list. You can select any of the features and perform an analysis to evaluate the defragmentation status.
The results of the operation performed are shown in the Report tab, which includes the file name, the number of fragments, the size, and the path of the files.
Boot Time Defrag is a feature that permits a user to defrag main hard drive before Windows even starts, which under normal conditions cannot be defragmented since they’re in use while Windows is running.
The handy utility also allows you to schedule the program to run on a daily, weekly or monthly basis.
For optimizing purposes, first select the hard drives you want to optimize and then choose Defrag and Optimize from the File menu. Thereafter, go to Tools > Options > Optimize.
The menu option holds the optimization settings that you can change. Under Move large files to the end of the drive you will notice the following four options:
- Minimum file size: This option can be altered to one of ten file sizes from 10-100 MB.
- Files that were not accessed in last month: Any file that not accessed in a month is automatically moved to the slower portion of the hard drive.
- Files in the Recycle Bin: All files under the Recycle Bin will be moved.
- Files in the selected types: Below this option you will find other useful options like Archives, Movies, and Disk Images.
Disk SpeedUp is a useful defragmentation software for Windows. It doesn’t hang up or crash. It has small download size and is pretty easy to install quickly and start defragmentation of files/folders as well as whole hard drives. The only shortfall is it doesn’t work from the right-click context menu in Windows Explorer.
It is available as a free download from its home page.
Any Uninstaller: Free alternative to Windows Program Uninstaller
Author: Unknown | 9:44 PM | 2 comments |
You can free up lots of space on your PC by uninstalling the programs you aren’t using. Moreover, when you uninstall unwanted software, you might just end up speeding up your Windows PC too, as it will even remove the start up entries and background processes which te software may be running, everytime your computer starts. While you can always use the built-in Uninstall feature in the Control panel, some third-party free uninstaller software might end up doing a better job. Any Uninstaller is a freeware which can help you uninstall, modify or repair any program easily.
Any Uninstaller for Windows
Soft4Boost Any Uninstaller works like the Windows standard program uninstaller, but comes with a few extra features which help you to get rid of the stubborn software on your computer system easily. It is a useful tool and a free alternative to Windows default program uninstaller.
This is a portable program with a user-friendly interface. Just download the program and run it. The program takes a few minutes to scan your PC and bring up a list of the programs installed.
Navigate the list of programs, select a program you want to remove and click on ‘Uninstall’ from the bar on top. You can also modify or repair the programs from your PC. After uninstalling the program, Any Uninstaller runs a cleanup on your PC and deletes the remnant files related to that particular program. The program also scans the PC thoroughly and shows up a list of all registry tracks and file tracks of the uninstalled program and deletes them.
The customizable interface of Any Uninstaller allows you to change the skin. There are 11 options of skins to choose from. Just click on ‘View’ button and select the skin you like. The program comes with a free lifetime update service plus unlimited free technical support for its users. Furthermore, there are many different language packs available for the users worldwide.
You can download the Any Uninstaller from here and remove all unwanted programs for your Windows PC.
4/5/15
Dukto: Cross-platform file sharing & transfer tool
Author: Unknown | 2:02 AM | No comments |
Dukto is a free tool designed to share files and information over LAN. Available for a variety of platforms, Dukto can be very useful if you share files very frequently over different devices. Dukto is available for almost all the popular platforms like Windows, Windows Phone, OS X, iOS, Linux, Android, Blackberry, Symbian, Open Pandora and Maemo. The tool is perfectly designed and is easy to operate. Along with sharing files you can even send text messages to other devices.
Dukto for Windows PC, Windows Phone
For Dukto to work, all the required devices must be connected to the same network either by Wi-Fi or cable. Dukto will automatically scan for devices available in LAN and display it to you.
Now to send a file to a device, just click on the device’s name and then choose ‘Send some Files’, if you want to send a folder or text then choose ‘Send a Folder’ or ‘Send some Text’ respectively. You can even send text message from the clipboard which is a useful feature for sharing links.
Dukto even supports IP connections which let you manually send some files by entering the other device’s IP address. The addresses option lets you view your own IP address. You can directly open the received files from the program itself and you can even open the folder where files are received. Under Settings you can change this folder path, moreover you can choose the accent color for the program.
The user interface of the program is inspired from Windows Phone and thus making the app easy to use. You can navigate between different pages as in Windows Phone and you can access the settings and other options from the bottom menu bar. The program involves zero configuration, which means you are always ready to go. Just run the application and start sending files. You need not have any knowledge about LAN – just make sure the devices are connected to the same network.
The availability of Dukto for most of the platforms make it a very useful tool to have. It is easy to operate and good to look at. It can send large files in just seconds which can take hours on Bluetooth. Bluetooth is now history and Wi-Fi sharing is in.
Click here to download Dukto. For Windows PC it is available in both installer, as well as portable version.
4/3/15
Encrypt and Decrypt important Files easily with Kryptelite
Author: Unknown | 10:44 AM | 1 comment |
Sending important files over the web is a task that is practiced on a daily basis around the world. With the rise in cyber attacks, computer users should always consider encrypting their files before pressing the send button. There are several free software available for data encryption, but today we are going to look at Kryptelite, one of the better encryption software available for download right now. We should point out that Kryptelite is the free version to Kryptel, so it will lack some features.
Krypelite free encryption software for Windows
Unlike the many file encryption software I’ve tested, Kryptelite is very easy to use and is designed for the home user. Users can encrypt and decrypt with just a few clicks of the mouse, yes, it is that easy to use. Furthermore, the software allows for the shredding of an unlimited amount of files just by right-clicking in Windows.
For those who do not wish to right-click, it is possible to drag and drop files to the Kryptelite icon on the desktop to have them shredded.
Many users would be glad to know that ZIP and BZIP2 compression is supported here.
While Kryptelite gives up support for command line capability, multi-pass shredding, legacy ciphers and other features found only in the premium versions, it does not give up industry-standard AES 256-bit encryption.
We like the fact that Kryptelite forces the user to enter a password twice, along with recognizing content on network shares and USB drives. We also have the option to choose different icons for files and folders, but that’s not something we wanted to play around with.
The tool may lack 64-bit processing; the ability to utilize multiple processor cores for faster performance among other things, but it is great nonetheless. Home users do not tend to encrypt files in the gigabytes, so the need for multicore processing and 64-bit support is moot.
One interesting thing about this encryption software is the amount of Windows versions it supports. We were surprised to find out it goes all the way back to Windows 2000 because not many regularly update software in this day and age still support versions of Microsoft’s operating system before Windows XP.
Kryptelite can be downloaded here. The file size it close to 9MB, and yes, it works flawlessly in Windows 10 too.
Create and Format bootable USB flash drives with Rufus
Author: Unknown | 10:35 AM | 1 comment |
Rufus stands for the Reliable USB Formatting Utility with Source. It is a tiny and lightweight utility for Windows PC, that helps to easily format, as well as create USB drives, such as USB keys, memory-sticks, and USB pen-drives etc., which are bootable and user-friendly. It has advanced and standard options to suit all the skill levels.
Create bootable media easily
This tool has a user friendly interface which looks like the built-in format panel of Windows. We can choose a partition scheme, device, cluster size, target system type, new volume label and file system types – like NTFS, FAT32, exFATand UDF..
There are a few basic formatting options available, which help us check the device to see if there are any bad blocks. It also helps in the selection of algorithms (from type 1 to type 4), we can create an extendable label, quick format mode and icon files. A bootable disk is created using the ISO image. Rufus tool records all the activities to a different panel, and it is saved into a log file.
This multifaceted tool is useful when:
- USB installation media need to be created from bootable ISOs (Linux, Windows, and UEFI)
- A person wants to work on a computer in which an OS is not installed
- For the purpose of flashing a BIOS or any other DOS, firmware is required
- A person wishes to run a low-level utility.
New features in Rufus 2.1.649:
- 32 bit support range for UEFI: NTFS boot
- Addition of Advanced mode stand-alone UEFI: NTFS with boot installation
- Disable support for hidden GRUB version ISOs
- Repair and correct Windows UEFI installation related issues while using GPT/NTFS.
- generating a repair of 32 bit installation flash drives in UEFI Windows 10.
Rufus for Windows free download
Rufus is arguably the best solution for creating and formatting a bootable USB drive. Download your copy of Rufus from the official website here.
4/2/15
Recover accidentally deleted Files with Disk Drill for Windows
Author: Unknown | 12:58 AM | No comments |
The popular Mac data recovery software, Disk Drill, is now available for Windows PC. The most important aspect of this app is that it is completely free and comes with a host of features to keep users happy. Disk Drill is perfect for recovering lost data, fixing a damaged partition, hard drive reformatting among many more.
Disk Drill for Windows PC
Disk Drill is a feature-rich software that should be easy for anyone to use, even the biggest newbie in the room. Using this tool you can backup a volume or partition from a failing drive and save it as DMG image to a new drive. Disk Drill for Windows can also help in the case of Partition loss, Accidental deletion, Failed bootups and Memory card corruption. This data recovery software can also help you with Hard drive reformatting and Recycle bin cleanup. Let us have a look at some of its features.
Recovering Data
After extensively using Disk Drill, we’ve come to the conclusion that this software is capable of recovering data from any storage, or should we say the ones we have tested. Whether it be USB flash drives, external drives, an MP3 player or memory cards, Disk Drill will get the job done without a fuss.
Ease Of Use
What really caught us off-guard about Disk Drill is how easy it is to use. The interface is friendly and not cluttered when compared to similar programs. Getting something done usually takes just a few clicks of the mouse, so complication is instantly thrown out the door.
Protection From Data Loss
The primary focus of Disk Drill is to recover lost data, but it can also protect against future data loss. The software comes with a feature called Recovery Vault, and basically what this does is to keep track of every file deleted since activation, so should something happen to the drive, recovering these files shouldn’t be too hard.
File Systems Support
One of the things we love about Disk Drill, is the amount of file systems it supports right off the bat. These systems includes the likes of FAT, exFAT or NTFS file system, is HFS+ Mac drive Linux EXT2/3/4 and more.
Overall Thought
Disk Drill is powerful and easy to use. The learning curve is far from being complex despite the amount of features available right now. We’ve tested it on Windows 7, Windows 8.1, and even the latest version of Windows 10 Technical Preview. Folks who are still rocking Windows XP shouldn’t come across an ounce of problems.
Folks who want a powerful file recovery software should jump on the Disk Drill bandwagon right away because we expect the developers to venture down a similar route to the Mac version. In the coming months, look out for a Basic and Pro version of Disk Drill for Windows. Some of the cool features available in the free version right now will likely be removed in order to draw users to the Pro version of the software.
Download Disk Drill for Windows, by clicking on the green Download tab on its home page.
Manage Trusted Root Certificates in Windows 8
Author: Unknown | 12:14 AM | No comments |
In one of our earlier posts, we have seen what Root Certificates are. There may be times, when some companies or users may feel the need to manage and configure Trusted Root Certificates, so as to prevent other users in the domain from configuring their own set. In this post, we will see how to manage Trusted Root Certificates & add certificates to Trusted Root Certification Authorities store in Windows 8.1.
Manage Trusted Root Certificates in Windows
To add certificates to the Trusted Root Certification Authorities store for a local computer, from the WinX Menu in Windows 8.1, open Run box, type mmc and hit Enter to open the Microsoft Management Control.
Press the File menu link and select Add/Remove Snap-in. Now under Available snap-ins, click Certificates,and then click Add.
Click OK. In the next dialog box, select Computer account and then on Next.
Now select Local computer and click on Finish.
Now, back in MMC, in the console tree, double-click on Certificates and then right-click on Trusted Root Certification Authorities Store. Under All tasks, select Import.
The Certificate Import Wizard will open.
Follow the instructions in the wizard to complete the process.
Now let us see how to configure and manage trusted root certificates for a local computer. Open MMC and press the File menu link and select Add/Remove Snap-in. Now under Available snap-ins, click Group Policy Object Editor,and then click Add. Select the computer whose local GPO you want to edit, and click Finish / OK.
Now, back in the MMC console tree, navigate to Local Computer Policy > Computer Configuration > Windows Settings > Security Settings. Next Public Key Policies. Double-click Certificate Path Validation Settings, and then select the Stores tab.
Here, select the Define these policy settings, Allow user trusted root CAs to be used to validate certificates and Allow users to trust peer trust certificates check boxes.

Finally under Root Certificate stores, select the root CAs that the client computers can trust and click OK.
To see how you can manage trusted root certificates for a domain and how to add certificates to the Trusted Root Certification Authorities store for a domain, visit Technet.
4/1/15
BeeDoctor for Windows PC: Optimization freeware integrated with an Antivirus
Author: Unknown | 11:58 PM | No comments |
BeeDoctor offers many features in a single suite, all aimed at optimizing and protecting your Windows computer. It includes an advanced system clean up mechanism, integrated Avira antivirus, software acceleration module and PC optimization tools.
BeeDoctor for Windows PC
BeeDoctor has four sections – Cleaner, Speed Optimizer, Antivirus and Uninstaller.
The Junk cleaner that can perform a deep scan to find and remove unused items that are not required by the computer. A detailed log gets created, once the clean-up process is over. It list’s down all items that were removed, which can also be restored back, if required. The detailed log, stores the information about the removed files, for few days, after which it is deleted permanently.
Its Speed Optimizer optimizes boot time, startup items and suggests clean up tasks which are required. An option to disable or enable running task or services is also available.
BeeDoctor includes a Self Protection feature that protects your computer from active malware threats and offers real time protection. If we talk about built-in protection feature, there are three types of scanning methods BeeDoctor has to offer us: Quick scan, Full scan and Scan in, all powered by Avira antivirus.
- Quick scan: Takes care of common files and folder scan.
- Full scan: Runs a detailed scan on every files and folders on your PC.
- Scan in: Will run a custom scan on selected files/folders when required.
A user can add pre-specified files/folders to trusted list as well.
The inbuilt Software Uninstaller works great. It has a deep cleaning mechanism to remove leftover registry items.
The tool can also be used to tweak the system issues. Some of the tweaks offered are – close unresponsive program automatically, improve effective bandwidth, optimize TTL values, reduce bandwidth consumption, optimize WINS query time and so on.
Apart from section wise optimization feature, BeeDoctor offers a “One Click” button that will scan your system and let you know at the end, which section requires your attention.
BeeDoctor is a freeware application, available for free download from their official website here . Do, give this freeware a try and share your experience with us in your comments below.
3/31/15
How to set a default User Logon Picture for all Users in Windows 8 & Windows 8.1
Author: Unknown | 10:39 PM | No comments |
This tutorial comes handy for those users who want to know how to set a default User Logon Picture for all users in Windows 8.1 and Windows 8. It could be the case of an office computer, where you may want to display the default company logo on a small number of computers. This can easily be achieved by making small changes in the Windows Registry or the Group Policy.
Set a default User Logon Picture for all Users
To complete this task in one go, get a picture that you want to display as the default logon picture. The image can be in .JPEG, .BMP, .DIB, .RLE, or .PNG format.
The image size should be 125x125px, in order to display properly. If the image used is bigger than this size, then it will be automatically cropped to fit the logon frame – or the image could be cut off.
Now, enable Show hidden files via Folder Options in order to change the default logon image, as Program Data stores default account pictures – and it is hidden by default.
Next, navigate to the following folder:
In Windows 8 : C:\ProgramData\Microsoft\User Account Pictures
In Windows 8.1 : C:\ProgramData\Microsoft\Default Account Pictures
Here rename guest.bmp and user.bmp as guest.bmp.bak and user.bmp.bak respectively.
Once you have done this, copy paste the image that you want to show as default logon picture, here.
Close the Account Picture folder.
Now let us see how to set a default User Logon Picture for all users!
Using Windows Registry
Open the Registry Editor. To do do, press Win+R to open Run dialog box, type regedit and press Enter.
Navigate to the following key:
HKEY_LOCAL_MACHINE\SOFTWARE\Microsoft\Windows\CurrentVersion\Policies\Explorer
In the right panel, right click and select New > DWORD (32-bit) Value. Give it name UseDefaultTile.
Click on Modify. Enter Value data as 1 for this DWORD (32-bit) and hit OK. A new registry enter will be added.
Once done close the Registry Editor and restart the computer to apply the changes.
After system restart, this new default user logon picture will appear for all users.
In case you don’t want to keep default logon image then simply go to registry editor and navigate to this same key
HKEY_LOCAL_MACHINE\SOFTWARE\Microsoft\Windows\CurrentVersion\Policies\Explorer
and delete UserDefaultTile.
Using Group Policy
If you have a basic understanding of how to work on group policy in a domain environment then these kind of changes can be done in just few clicks . The changes will affect all the computers connected to that domain controller in real time. The Group Policy can be easily applied or removed without going deep into registry.
If your version of Windows includes Group Policy, then Run gpedit.msc and navigate to the following setting:
Computer Configuration > Administrative Templates > Control Panel > User Accounts.
Double-click Apply the default user logon picture to all users, and enable this setting. Click OK/Apply and Exit.
FIND US ON FACEBOOK
FIND US ON Twitter
Popular Posts
Categories
Windows
PHP
PHP - TUTORIAL
Freeware
ubuntu
Online
Windows8
Windows Tutorials
Android
Google
Microsoft Office
Windows7
Linux
TOP - 10
computer tips
How-to
centos
Excel
Gmail
Internet
Phone
Website
WhatsApp
Windows10
Windows8.1
apache2
top
Backup
Debian
Fedora
Firefox
Microsoft
PDF
RHEL
TIPS
Tutorials
Twitter
Wikipedia
Windows Phone
linuxmint
mysql
web
Adsense
Amazon
Antivirus
Apple
Apple Watch
BIOS
Blogging
Cloud Computing
Codeigniter
Computer
Download
E-Book
Ebook
Eset
Facebook
Folder lock
Fonts
Games
Google Hangouts
Google chrome
Google drive
Hard Disk
Income Tax
Junk Files
LG
Lenovo
MAC Address
Mobi
Mobile comparison
MongoDB
Moto
Moto E
Mysql installation
OpenSUSE
PCLinuxOS
Photos
PostgreSQL
Programming Languages
RSS
Recovery
Redmi
Stock
Tomcat
Torrent
USB
Vlc Player
Wifi
audio
computer safety
computer safety tips
computer security tips
gif
htaccess
install
lamp
phpmyadmin
public computers
screen to gif
tasksel
terminal
using a computer
widgets