3/31/15

Fix: Logon Failure, Unknown username or bad password, while joining Shared Computer

If you’re in a workplace where you often need to connect different systems, like in a computer class, exam center, etc., you need to share one system with another one. However, sometimes sharing may not be easy and you may face trouble while connecting machines. If you’re not able to access a shared folder on Windows 8, from a Windows 7machine, that is a different issue. But if your are unable to join a Shared Computer, then this post may help you troubleshoot the problem.


Consider a scenario – you fixed the sharing for a system to “everyone”. When you go on to enter your network credentials to connect to the shared computer, even when you submit the correct credentials, you receive a message Logon Failure Unknown user name or bad password. When you try to join that system from another machine, you’re kept asking the credentials again and again. When you enter the system username and password, you get a logon failure message. So basically, invalid credentials are causing  the issue, although you have set permission of shared system as ‘without requiring credentials’.

Logon Failure Unknown username or bad password

If you are facing this problem, here is simple method to resolve this issue:
Making mistakes while editing the Windows Registry could affect your system adversely. So be careful while editing registry entries and create a System Restore point before proceeding.
1. Press Windows Key + R combination, type put regedit in Run dialog box and hit Enter to open the Registry Editor.
2. In the left pane of Registry Editor, navigate here:
HKEY_LOCAL_MACHINE\SYSTEM\CurrentControlSet\Control\Lsa
logon failure unknown username or bad password
3. In the left pane of this registry location, highlight the Lsa key and come to its right pane. Then, right click in blank space and select New -> DWORD Value. Give the newly created DWORD (REG_DWORD) as LmCompatibilityLevelname double click on it to get this:
Logon-Failure-While-Joining-2
4. In the above shown Edit DWORD Value box, put the Value data equals to 1. Click OK. You can now close Registry Editor and reboot the machine. After restarting your computer, you’ll be easily able to join the shared system.

3/30/15

How to get a list of files in a folder into Excel

In this post we will see how to get a list of files in a folder into Excel. We will show you how to use Excel to view Files and Folders details in Windows, by importing all files and folders details in to Microsoft Excel to keep track of file size, file type and last modified date.

We have many files and folders in our Windows PC and we may delete or add more files and folders frequently. There could be some folders and files which are very important to us and someone might edit them without our notice. But, we cannot keep on looking at each and every folder and file to know which one was edited. If it was modification of a file or folder, we can sort them by using ‘Last modified’ and we can get to know which were modified recently.


But, what if some of the files and folders were deleted from that directory? We would not be in a position to keep track of what were exactly deleted. But, you can use Excel to view files and folder details of directory which would be helpful to you to know at least the list of files and folders that were deleted.
How to get a list of files in a folder into Excel

Import and get a list of filenames into an Excel sheet

If you use Microsoft Excel to import all details of files and folders in to Excel, it will help you keep track of last modified date and time, file types, list of files, files size and many more regularly. To do this, follow these simple steps.
Move to the directory or folder on Windows File Explorer which you want to keep track of. Here, I want to keep track of my files and folders of Documents folder. Copy the path of that directory.
Directory path
Now, open any web browser of your choice and paste the copied path (Path of the folder you just copied in the previous step) in the address bar of the browser. I used Google Chrome here. Just prefix the URL by file:///and the content will be shown as the web page.
Contents of my directory
To save this web page as the offline copy, press CTRL+S or right-click on the web page and select “Save Page As”. Select the destination, give it a name and save the webpage.
save offline webpage

Now, via Windows Explorer go the location you saved the offline webpage and copy the path. The, open the Excel sheet and tap on the Data tab and click on From Web. It opens up the Window and in the Address bar paste the copied path and click “Go” button. It will load all the contents of the webpage.
Import from web
It shows you the yellow boxes with arrows and it will allows you to select the required frame. You can find here that I selected the part I want.
Select the frame
Once done with these steps, now click on import button and you see that all the files and folders details are imported to your Excel sheet in no time. You can see that, data is shown the columns and gives us the clear idea of every detail.
import files and folders details to excel
Conclusion
As we are engaged most of the time, in organizing files and folders, it is advisable to import files and folders details in to Excel. This would be helpful if any of your file or folder was to get deleted. The data in the Excel sheet does not refresh, so we need to import the data regularly. You can use this method, when to not only keep track of file changes, but also filenames.

3/24/15

Make Device Manager show Non present devices in Windows

In this post we will see how to make built-in Device Manager to show non present devices in Windows 8 / 7. Non-present devices are those old, unused, previous, hidden devices that were once installed, but are now no longer attached to the computer.

The Windows Device Manager helps you uninstall, disable, roll back, update Device Drivers in Windows 8 / 7. It displays details about the currently installed and connected Plug and Play devices. To view the Non Plug and Play devices, from the View tab, you have to select Show hidden devices. But to show all non-present devices, you will have to do the following.

Show non present devices using Device Manager


To show non-present devices in Windows 8.1, using Device Manager, open an elevated command prompt windows, type the following and hit Enter:
SET DEVMGR_SHOW_NONPRESENT_DEVICES=1
Next, type devmgmt.msc and hit Enter to open the Device Manager.
Having done this, from the View tab, select Show hidden devices. You will see some additional devices get listed here.
show hidden devices windows
This is pretty useful if you need to troubleshoot and fix problems caused by leftover drivers. Right-clicking on them and selecting Properties will give you additional information about them.
You can also show non-present devices by tweaking Environment Variables and remove the old device drivers. Device Cleanup Tool will help you remove multiple or all old, non-present devices from your Windows computer. GhostBuster can help you remove old, unused, hidden device drivers.

Remote session was disconnected. No Remote Desktop client access licenses available

Remote Desktop Protocol (RDP) basically helps us to connect two system at distant location. We’ve already seen how to enable, disable the Remote Desktop connection using RDP protocol. However, when you establish a Remote Desktopconnection on Windows 8.1, 8, 7 or Vista operating systems, sometimes licensing errors may arise. Generally, in such cases, you’re likely to receive following error:
The remote session was disconnected because there are no Remote Desktop client access licenses available for this computer. Please contact the server administrator.

The root cause behind this issue is that the Terminal Server (TS) is not able to locate license server. Thus as a result of this, you received the message and are unable to bridge a Remote Desktop connection.
If you face this problem on Windows Server, it is better to check if the license server is correctly installed, and Terminal Server Licensing service is running perfectly on it. If this doesn’t helps, you need to follow these steps:
Making mistakes while editing the Windows Registry could affect your system adversely. So be careful while editing registry entries and create a System Restore point before proceeding.
1. Press Windows Key + R combination, type put regedit in Run dialog box and hit Enter to open the Registry Editor.

2. In the left pane of Registry Editor, navigate here:
HKEY_LOCAL_MACHINE\SOFTWARE\Microsoft\MSLicensing
No Remote Desktop client access licenses
3. In the above shown window, right click on the MSLicensing key and select Export. This will let you to save this registry key in terms of registry file as a backup. Now right click same registry key and select Delete.
Remote-Desktop-Disconnected-2
Provide the registry key delete confirmation by clicking Yes option here:
Remote-Desktop-Disconnected-3
After deleting you must close Registry Editor and restart the machine. When next time, the Remote Desktop client is started, the deleted  registry key will be rebuilt, consequently solving the problem.

3/18/15

How to Automatically Login in Windows 8 without entering a Password

Windows 8 RTM has been officially released recently and a significant amount of users are already running Windows 8. This new OS from Microsoft features a Modern UI (formerly known as Metro style) and various other prominent features. Windows 8 Final offers 2 Sign-in options – either using a Microsoft account (Windows Live ID) or without a Microsoft account aka Local Account. For instance, if you’ve setup Windows using a Microsoft account then Windows 8 will ask you to enter the password every time you login using your Live ID (Hotmail/Outlook) and your PC must be connected to Internet. This feature is meant for enhanced security but at the same time it becomes pretty irritating to input the password every time you login, specially for home users.
Fortunately, there is an easy way to remove login password in Windows 8 and thus log in automatically without entering any password. We however don’t recommend to enable automatic login if your PC is accessible by multiple users or while you’re travelling. To enable auto-login on Windows 8, follow the simple steps below.
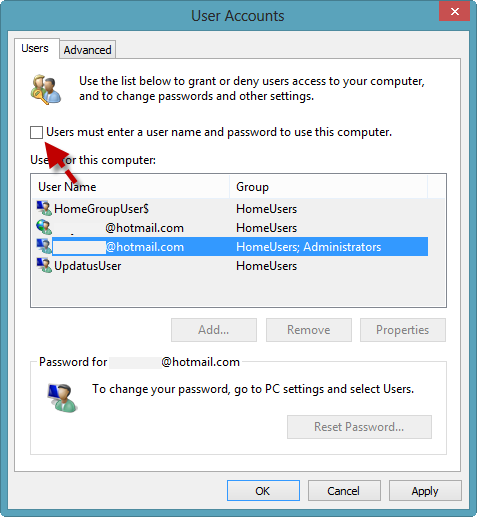
1. Open Run (Win + R) and enter “netplwiz” (without quotes) or search for netplwizdirectly from the metro screen.
2. On opening “netplwiz”, User Accounts window will open up. Under the Users tab, select the Administrators account and uncheck the option “Users must enter a user name and password to use this computer.” Click Ok.
3. Enter the password for confirmation and hit Ok.

Restart you PC. Windows 8 will now automatically logon without the need to enter the username and password.
Note: Windows will ask the password in case you Log Off or Lock your Windows. It’ll even ask for password when resuming from Sleep mode but that can be disabled too.
To prevent Windows 8 from asking password when waking from Sleep, go to Settings from the Metro UI > Change PC Settings > Users. Click on the Changebutton below the entry “Any user who has a password must enter it when waking this PC.” and click Ok to confirm.

Those running Windows 8.1,  go to Settings from the Metro UI > Change PC Settings > Accounts > Sign-in options. Click on the Change button for the “Password Policy” option that says ‘Password is required when waking this PC from sleep.’ and click Change to confirm.
Now you don’t need to enter the password when your computer wakes from sleep.

3/17/15

Control Panel will not open in Windows 8 / 7

If your Control Panel will not open in Windows 8, then this post will help you troubleshoot and fix the problem. It is quite possible that your computer may be infected with malware, the .cpl file may have become corrupted or damaged or the .cpl file association may have been broken. Before you commence troubleshooting the issue, remember to create a system restore point first.

Control Panel will not open

1] Run a full-scan with your antivirus software.
2] See if you can open Control Panel in Safe Mode or Clean Boot State. If you can, then some start-up is interfering with its operation. In Clean Boot State you will have to identify the offending program by disabling/enabling each of the start-ups.
3] Open File Explorer, type the following in the address bar and hit Enter to open your Syatem32 folder:
%SystemRoot%\System32
Search for *.cpl in this folder. The results will display all the Control panel applet files.

Click on appwiz.cpl and see if the main Control Panel window opens. If it does not, then from the WinX menu, openRun, type appwiz.cpl and hit Enter. Does the main Control Panel window open? If not, then it is quite possible that some .cpl file may have been damaged or got corrupted.
Click each one and see if the related Control Panel tool opens. If something does not, then it means that, that particular .cpl file has been corrupted or damaged.
Third-party software and hardware manufacturers often add Control Panel icons to provide an interface for setting configuration options for their products. If any of these 3rd-party Control panel icons has become damaged, it is best to delete it. But if it is some system .cpl file, then read on.
4] Run sfc /scannow to start the System File Checker. Restart your computer once the run is completed. This will replace corrupted system files, if any. Now see if you are able to open Control Panel now.
5] Check and set the File Association for Control Panel files and see if it helps. Now I am aware that you are unable to open Control panel, but if via the System32 folder as described above, you are able to click open inetcpl.cpl, then please do so. Then under its Programs tab, click on the Set associations button, under File Associations section to open the following window.
control-panel-open
Here check if .cpl files are set to open with the default Windows Control Panel. If not set it so.
If you cannot do this, then simply download and apply this registry fix for .cpl files from DougKnox. The fix is for Windows XP, but should work for later versions too. Extract its contents and click on it to add it to your Windows Registry. If you don’t like the results, you can go back to the created system restore point.
6] If nothing helps, you may have to consider a System Restore operation or use the Refresh PC or Reset PC feature.
Let us know if anything worked for you.
See this post if Change PC Settings does not open in Windows 8.1 and this one if Control Panel window is blank.

Run Android apps & games on Windows PC using Andy

Ever wanted to play Android games on your Windows PC or wanted to run Android apps like WhatsApp, BBM on your Windows 8 PC? The idea seems great and is brought to reality by Andy. Andy is a free Android emulator that runs on VMware VirtualBox technology. Though facing competition with BlueStacks, Andy stands out differently with some features that even BlueStacks doesn’t offer.

Run Android apps & games on Windows PC


Andy gives you a pure Android feeling by installing an Android tablet firmware on a virtual space. If you switch to the full-screen mode, you will feel like you are operating an Android PC.
Let it be games like ‘Clash of Clans’ or social apps like ‘WhatsApp’, it can run almost any Android app that can run on a normal Android tablet.
Andy Settings
There are lot of bundled apps provided by the developers which include popular games and social media apps which are available for Android platform. This freeware comes pre-installed with 1Click Sync application that ensures seamless integration of apps from PC to mobile device without any hassle of making a connection. You can use your mobile as a remote control for Andy to play games by simply downloading the Andy Remote Control app from Google Play here.
The developers made a comparison between Andy, BlueStacks and YouWave which are considered as the best Android emulators. I would like to add the comparison in this post to highlight the features where Andy stands differently.
Andy Comparison

Courtesy: Andyroid.net
Installing and setting up Andy is a very easy job. You just need to run the setup, click ‘Next’ a few times then the installer is on its own. It will automatically download the required files, VirtualBox and will automatically integrate Andy into VirtualBox, and you will not even feel that you’ve installed VirtualBox on your Windows computer. If you manually want to change some settings for Andy you can do so by opening the VirtualBox from the Start Menu.
Andy Virtual Box
Overall, Andy is a complete Android solution for Windows, but if you are thinking of turning your PC into and Android machine then Andy will not be a suitable option. It has been developed just to enjoy apps on bigger screen that are available on your Android phone. Playing mobile games on a bigger screen is real fun and if you get applications like WhatsApp on your PC then it is amazing too.

Andy free download

Click here to download Andy.

Rename built-in Administrator Account in Windows 8 / 7

Windows includes a built-in Administrator account, sometimes referred to as the Super Administrator account, which is often targetted at by computer hackers and malware with malicious intent. It may therefore be a good idea to rename this Administrator account in your Windows system.

Rename Administrator Account in Windows

If you wish to rename your Administrator account, you may follow any one of these steps.
1] From the Windows 8.1 WinX Menu, open the Computer Management console. Expand Local Users and Groups > Users. Now in the middle pane, select and right-click on the administrator account you wish to rename, and from the context menu option, click on Rename. You can rename any Administrator account this way.

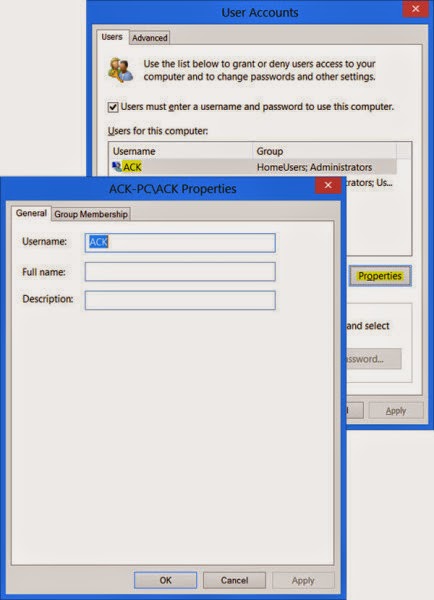
2] You can use a Control Panel applet to rename the administrator account. To sue this way, Run Control UserPasswords2 and hit Enter.

Under the Users tab, select the username and click on the Properties button. You will be able to rename it under the General tab. This method will let you rename an Administrator account which is active and enabled.
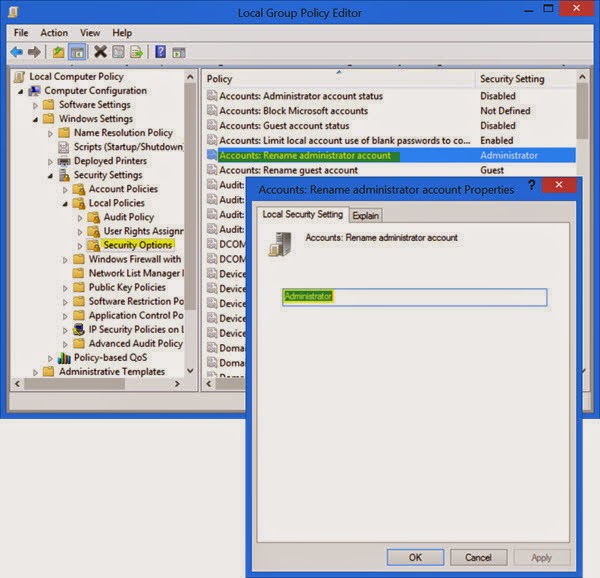
3] If your Windows OS has the Group Policy Editor, do the following. Run gpedit.msc to open the Local Group Policy Editor. Next, navigate as follows: Computer Configuration > Windows Settings > Security Settings > Local Policies, and select Security Options
Find Accounts: Rename administrator account, and double-click on it.
This security setting determines whether a different account name is associated with the security identifier (SID) for the account Administrator. Renaming the well-known Administrator account makes it slightly more difficult for unauthorized persons to guess this privileged user name and password combination.

In the configuration box which opens, under the Local Security Setting tab, you will be able to rename Administrator in the text box. Click Apply > OK and Exit. Using this method you will be able to rename the built-in Administrator account.
4] You can also use the command line to rename the admin account. Open an elevated command prompt window and use the following command for WMIC utility, replacing CustomAdminname with your desired name.
wmic useraccount where name='Administrator' call rename name='CustomAdminName'
5] RenameUser is a free tool that will help you rename administrator accounts. You can download it from here.
Since it is the administrator user account you will be dealing with, please be careful when you rename it. If need be, make a note of the new name and password on a piece of paper.

FIND US ON FACEBOOK

FIND US ON Twitter