3/31/15

KeyTweak: Reassign and redefine keyboard keys in Windows 8 / 7

KeyTweak is a free keyboard remapper software for Windows, that lets you easily reconfigure, reassign and redefine your keyboard as per your needs. Remapping is re-allocation of keyboard functions. You can remap a key to some other function so that whenever you press that key again a different function occurs. You can basically carry out remapping to adjust the keyboard as per your needs and customize your Windows computing experience.

Reassign and redefine Keyboard Keys

KeyTweak is a simple yet powerful tool which can make changes to the Windows Registry so as to to re-allocate the keyboard functions. It comes with an intuitive UI which makes the whole process a lot easier. The virtual keyboard is displayed with numbers which resemble the most common keyboards, and using this virtual keyboard you can remap almost any key of your keyboard.

How to Remap

The program has capabilities to roll back the changes made by you to the keyboard functions, but still it is recommended to create a system restore point before remapping the keys.
First of all, locate the button on the virtual keyboard that you want to remap. Press the button and confirm its current mapping.
Now choose the new remapping from the dropdown and then hit the ‘Remap Key’ button. You can even disable a keyboard key by simply pressing ‘Disable Key’ button. All the changes made by you will be shifted to Pending Changes. Once you are done with remapping the keys you can click the ‘Apply’ button. The application will prompt you for a restart. Click Yes to restart your computer, for the changes to take place.
Though the program is easy to understand and use, it still includes a Full Teach and a Half Teach mode, that are more task-oriented and easy to understand. Under the Half Teach mode, the program automatically scans a key you’ve pressed. You then need to choose the remapping action from the drop-down menu. Under the Full Teach mode, the program first scans the original key that you press. To remap that again you need to press the action, which is relatively a very easiy task.
KeyTweak free download
KeyTweak can even work with the speciality buttons of your keyboard which are normally located on the top, just before the function buttons.
The application is well-designed and built. It is easy to work with and even comes with capabilities of rolling back the settings to defaults, which comes handy when you’ve messed up with the settings. Moreover, the teach modes are interesting to follow.

KeyTweak free download

Click here to download KeyTweak.
3/29/15

Create Drives for your desired Folder with Visual Subst

Visual Subst for Windows, lets you create, mount, set any folder as Virtual Drive. It lets you access frequently used folders directly from My PC or Computer folder.

Suppose you are working on an project and have placed your project folder in a drive. To access that particular folder you have to go across many folders and sub folders. So, instead of investing time in browsing so many folders, how about creating drives with the name of folders? Using portable Visual Subst freeware for Windows 8 / 7, you can create drives of those folders, which you are currently working on. After creating the drives, these files can be easily accessed. This helps you to open your folders quickly with just one click.

Visual Subst is a small tool that allows you map virtual drives easily. You can associate the most accessed directories with virtual drives using this freeware. It comes with a simple graphical user interface. It is also designed for those who are really fond of using cloud storage software like Dropbox and Google Drive. Visual Subst make it easier for you to create drives and even remove it when not needed.

Visual Subst features

Visual Subst is a very handy tool that comes with handful features making the task of the end user easier. Some of the features worth mentioning are:
  • It is portable
  • Straight forward interface
  • If drive letter is used by another drive, it fixes the error automatically
  • Quick and easy access to frequently used folders
  • Small and handy utility.
Mount and set any folder as Virtual Drive
To mount and set a folder as a drive or to create drives, all you need to do is just to download Visual Subst software from its official website and click on Vsubst to run it.
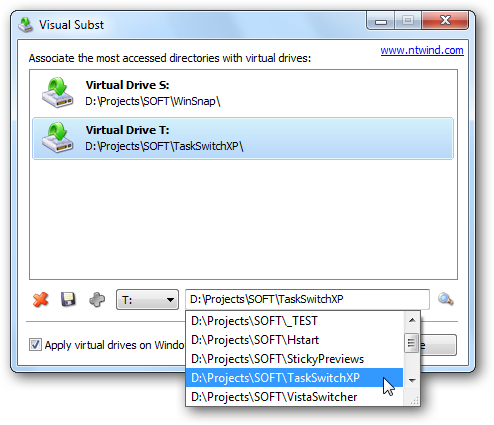
On the home page, click on the dropdown available at the bottom. Select any letter of your drive where you want to create the folder.
Visual Subst
After selecting the letter for your drive, click on the magnifying glass to browse the folder you want to set as a drive. You can select any folder or even create a new one.
1-create-drives-3
Once you select the folder, click on the bold green icon to create drive of that particular folder.
1-create-drives-4
To see the created drive in the list you can open the Windows File Explorer and check it.
Click here to download Visual Subst. It is fully portable tool as all its settings and configurations are stored in an INI-file.

3/26/15

Elevated Privileges in Windows 8 / 7


You must have noticed, there are often, many programs installed on your machine that require administrative rights to start. Having admin rights lets you make changes to the system, that can affect all other users. In other words, any program that you decide to run as administrator, lets it more access to the computer when it runs.

The User Account Control notifies you before changes are made – not all changes, but only those which require administrator level or elevated permissions. Whenever you run some programs, you may get to see the UAC Prompt first. Only after you give your consent, will the program run. This is a security feature in Windows. The key lies in understanding what can be done and how changes to admin rights or elevated privileges can be achieved without compromising security.

Let us see the various options and scenarios.
Open elevated Command Prompt window
While you can carry out many tasks using the CMD, some tasks required elevated privileges to carry out. Windows 8.1 lets you easily open Command Prompt (Admin) using the WinX menu. This post shows how you can run Command Prompt as an Administrator.
Make program always Run as Administrator
If you want to make a program always run with admin privileges, right-click on the program’s executable file, select Properties. Here, select the Run this program as an administrator box. Click Apply > OK. This post will show you in detail, how to make applications always Run as Administrator.
Turn off Admin Approval Mode using Secpol
Run secpol.msc to open the Local Security Policy and navigate to Local Policies > Security Settings. In the right pane you will see a setting User Account Control: Turn on Admin Approval Mode. Double-click on it and select Disabled.
Elevated Privileges in Windows
This policy setting controls the behavior of all User Account Control (UAC) policy settings for the computer. If you change this policy setting, you must restart your computer. The options are:(1) Enabled. (Default) Admin Approval Mode is enabled. This policy must be enabled and related UAC policy settings must also be set appropriately to allow the built-in Administrator account and all other users who are members of the Administrators group to run in Admin Approval Mode. (2) Disabled. Admin Approval Mode and all related UAC policy settings are disabled. If this policy setting is disabled, the Security Center notifies you that the overall security of the operating system has been reduced.
Mind you, this WILL downgrade your computer’s overall security!

Grant Elevated Privileges in Windows 8

A Standard user does not have any special permission for making changes in the server administration. He may not have the following privileges: Adding, deleting, modifying a user, shutting down the server, creating and administering Group Policy Object, modifying file permissions, and so on.
But a user with admin rights, can do much more than the standard user. The rights however, are granted after he is given elevated privileges for each level in one of the groups viz, Local Server, Domain and Forest.
When a user is added to one of the groups they get extra power to do more than the standard user. They get extra User Rights. These are the rights or configurations that control “who” can do “what” to the computer. When configured, each computer can support a unique set of administrators controlling different areas of that computer.
There are over 35 user rights per computer. Some of the most common user rights that control elevated privileges over a computer are listed below:
  • Shut down the system
  • Force shutdown of remote system
  • Log on as a batch job
  • Log on as a service
  • Backup and Restore files and directories
  • Enable trusted for delegation
  • Generate security audits
  • Load and unload device drivers
  • Manage auditing and security log
  • Take ownership of files and other objects
The user rights are deployed using Group Policy (Local/Active Directory). This paves the way for controlling the access to servers in a consistent manner.
Moreover, each file, folder, and Registry key has an Access Control List (ACL). The list provides standard permissions, like
  1. Full control
  2. Modify
  3. Read
These standard permissions enable easier configuration over the objects. In short, ACL is a sort of list of users, groups, and/or computers that are granted permissions over the object associated with the ACL. You can read the full details about this, Active Directory Delegation, Group Policy Delegation and more, at this excellent post on WindowsSecurity.com. It discusses how to grant elevated privileges over Active Directory and a Server.

3/23/15

DelFix: Remove disinfection tools from Windows PC

If you are a regular user of some online computer help forums, you might have faced this problem. When we run the anti-malware tools and troubleshooters suggested in these computer help forums, many associated files and log files land on our Windows PC and remain there even after the troubleshooting is completed. We even forget to delete the disinfection tools from our computers, even after their work is over. For instance, we may used a standalone second opinion antivirus scanner to remove malware from our computers and then forget about deleting the tool. After some times, its definitions would get outdated and it would make sense to delete it.


DelFix for Windows

This is where DelFix can help you. It is a program which will will reset system settings, clean your system thoroughly and removes various tools installed on your PC along with their associated and the leftover files. After the completion, it creates a log file of disinfection tools removal.
DelFix is a tool developed by Xplode, the makers of AdwCleaner, which can remove all portable virus cleaning and disinfection tools you’ve ever used. It will also reset the restore points of your computer systems making it even safer.
The program makes some other adjustments to your PC too which include:
  • Activate UAC: It activates the user account control after cleaning the log files and the unnecessary clutter in your PC.
  • Remove disinfection tools: Removes the tool you’ve ever used to disinfect your PC.
  • Create registry backup: The program creates a registry backup and stores it under % windir% \ ERUNT \ DelFix.
  • Purge system restore: Deletes all your older restore points and creates a fresh one.
  • Reset system settings: It resets the system settings after the removal process is completed.
DelFix is a useful program designed specifically to remove the disinfecting tool when no longer needed. Developer’s page says it is compatible with 8 in 32 & 64 bits, Win 7, Vista and Windows XP, but it worked well on my Windows 8.1 PC too.
Just download the program from here and run it on your computer system. There is a default check-mark on feature ‘Remove disinfection tools’ and you need to check other feature manually before running the program – should you wish to. Wait for a few minutes and your computer system will be free of all unnecessary files.

3/17/15

Control Panel will not open in Windows 8 / 7

If your Control Panel will not open in Windows 8, then this post will help you troubleshoot and fix the problem. It is quite possible that your computer may be infected with malware, the .cpl file may have become corrupted or damaged or the .cpl file association may have been broken. Before you commence troubleshooting the issue, remember to create a system restore point first.

Control Panel will not open

1] Run a full-scan with your antivirus software.
2] See if you can open Control Panel in Safe Mode or Clean Boot State. If you can, then some start-up is interfering with its operation. In Clean Boot State you will have to identify the offending program by disabling/enabling each of the start-ups.
3] Open File Explorer, type the following in the address bar and hit Enter to open your Syatem32 folder:
%SystemRoot%\System32
Search for *.cpl in this folder. The results will display all the Control panel applet files.

Click on appwiz.cpl and see if the main Control Panel window opens. If it does not, then from the WinX menu, openRun, type appwiz.cpl and hit Enter. Does the main Control Panel window open? If not, then it is quite possible that some .cpl file may have been damaged or got corrupted.
Click each one and see if the related Control Panel tool opens. If something does not, then it means that, that particular .cpl file has been corrupted or damaged.
Third-party software and hardware manufacturers often add Control Panel icons to provide an interface for setting configuration options for their products. If any of these 3rd-party Control panel icons has become damaged, it is best to delete it. But if it is some system .cpl file, then read on.
4] Run sfc /scannow to start the System File Checker. Restart your computer once the run is completed. This will replace corrupted system files, if any. Now see if you are able to open Control Panel now.
5] Check and set the File Association for Control Panel files and see if it helps. Now I am aware that you are unable to open Control panel, but if via the System32 folder as described above, you are able to click open inetcpl.cpl, then please do so. Then under its Programs tab, click on the Set associations button, under File Associations section to open the following window.
control-panel-open
Here check if .cpl files are set to open with the default Windows Control Panel. If not set it so.
If you cannot do this, then simply download and apply this registry fix for .cpl files from DougKnox. The fix is for Windows XP, but should work for later versions too. Extract its contents and click on it to add it to your Windows Registry. If you don’t like the results, you can go back to the created system restore point.
6] If nothing helps, you may have to consider a System Restore operation or use the Refresh PC or Reset PC feature.
Let us know if anything worked for you.
See this post if Change PC Settings does not open in Windows 8.1 and this one if Control Panel window is blank.

Rename built-in Administrator Account in Windows 8 / 7

Windows includes a built-in Administrator account, sometimes referred to as the Super Administrator account, which is often targetted at by computer hackers and malware with malicious intent. It may therefore be a good idea to rename this Administrator account in your Windows system.

Rename Administrator Account in Windows

If you wish to rename your Administrator account, you may follow any one of these steps.
1] From the Windows 8.1 WinX Menu, open the Computer Management console. Expand Local Users and Groups > Users. Now in the middle pane, select and right-click on the administrator account you wish to rename, and from the context menu option, click on Rename. You can rename any Administrator account this way.

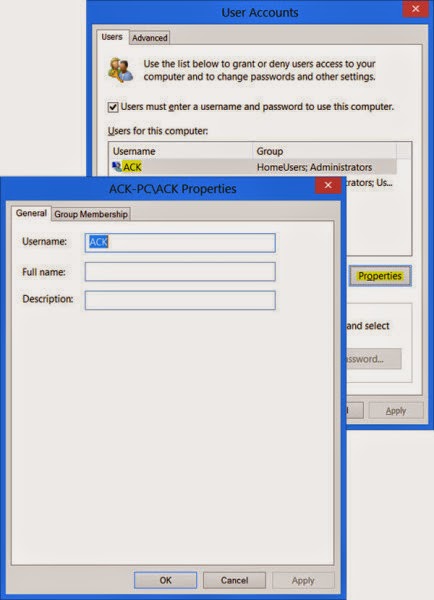
2] You can use a Control Panel applet to rename the administrator account. To sue this way, Run Control UserPasswords2 and hit Enter.

Under the Users tab, select the username and click on the Properties button. You will be able to rename it under the General tab. This method will let you rename an Administrator account which is active and enabled.
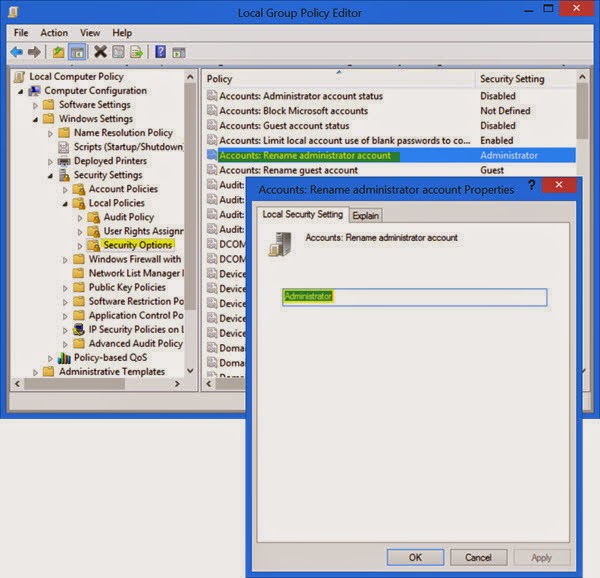
3] If your Windows OS has the Group Policy Editor, do the following. Run gpedit.msc to open the Local Group Policy Editor. Next, navigate as follows: Computer Configuration > Windows Settings > Security Settings > Local Policies, and select Security Options
Find Accounts: Rename administrator account, and double-click on it.
This security setting determines whether a different account name is associated with the security identifier (SID) for the account Administrator. Renaming the well-known Administrator account makes it slightly more difficult for unauthorized persons to guess this privileged user name and password combination.

In the configuration box which opens, under the Local Security Setting tab, you will be able to rename Administrator in the text box. Click Apply > OK and Exit. Using this method you will be able to rename the built-in Administrator account.
4] You can also use the command line to rename the admin account. Open an elevated command prompt window and use the following command for WMIC utility, replacing CustomAdminname with your desired name.
wmic useraccount where name='Administrator' call rename name='CustomAdminName'
5] RenameUser is a free tool that will help you rename administrator accounts. You can download it from here.
Since it is the administrator user account you will be dealing with, please be careful when you rename it. If need be, make a note of the new name and password on a piece of paper.

FIND US ON FACEBOOK

FIND US ON Twitter